This Hal interface module provides the ability to connect HAL pins to NML commands. It should provide similar hardware button connections to those functions in emc's graphical interfaces. Please edit this page so that it represents your understanding of hardware based human machine interfaces.
Next, start emc2 and halui will be run in the background automagically. All you need to do next is connect the various pins (check the section about naming of the pins) to your actual buttons & leds. You can always emulate hardware buttons by using HalVCP? (as described in the next section).
Taken from the sample configuration halui_halvcp. If you run that configuration you will get an HalVCP? panel (emulates HAL pins using GTK widgets) like this:
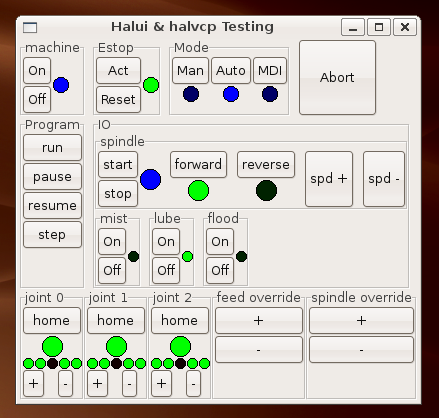
You can see most of the buttons you can have on a real panel. By looking at the sample configuration, one can easily adapt that to a hardware panel with real knobs & leds & switches.
Naming:
All pins will be named after the following scheme:
halui.name.<number>.action
  name    refers to the name of the component,
             currently one of:
	     - machine
	     - estop
	     - mode
	     - mist
	     - flood
	     - lube
	     - jog
	     - program
	     - probe
	     ...
<number> if more than one component of the same type exists
  action     usually on/off or is-on for the status (this uses the NIST way of
	     control, each action is done by momentary pushbuttons, and thus
	     more than one source of control is allowed: e.g. multiple UI's,
	     GUI's )
Exported pins:
DONE: - machine:
   halui.machine.on                    bit  //pin for setting machine On
   halui.machine.off                   bit  //pin for setting machine Off
   halui.machine.is-on                 bit  //pin for machine is On/Off?
DONE: - estop:
   halui.estop.activate                bit  //pin for setting Estop (emc internal) On
   halui.estop.reset                   bit  //pin for resetting Estop (emc internal) Off
   halui.estop.is-reset                bit  //pin for displaying Estop state (emc internal) On/Off?
DONE: - mode:
   halui.mode.manual                   bit  //pin for requesting manual mode
   halui.mode.is-manual                bit  //pin for manual mode is on
   halui.mode.auto                     bit  //pin for requesting auto mode
   halui.mode.is-auto                  bit  //pin for auto mode is on
   halui.mode.mdi                      bit  //pin for requesting mdi mode
   halui.mode.is-mdi                   bit  //pin for mdi mode is on
DONE: - mist, flood, lube:
   halui.mist.on                       bit  //pin for starting mist
   halui.mist.off                      bit  //pin for stoping mist
   halui.mist.is-on                    bit  //pin for mist is on
   halui.flood.on                      bit  //pin for starting flood
   halui.flood.off                     bit  //pin for stoping flood
   halui.flood.is-on                   bit  //pin for flood is on
   halui.lube.on                       bit  //pin for starting lube
   halui.lube.off                      bit  //pin for stoping lube
   halui.lube.is-on                    bit  //pin for lube is on
DONE: - spindle:
   halui.spindle.start                 bit
   halui.spindle.stop                  bit
   halui.spindle.forward               bit
   halui.spindle.reverse               bit
   halui.spindle.increase              bit
   halui.spindle.decrease              bit
   halui.spindle.brake-on              bit  //pin for activating spindle-brake
   halui.spindle.brake-off             bit  //pin for deactivating spindle/brake
   halui.spindle.brake-is-on           bit  //status pin that tells us if brake is on
DONE: - joint:
   halui.joint.0.home                  bit  // pin for homing the specific joint
   halui.joint.0.is-homed              bit  // status pin telling that the joint is homed
   ..
   halui.joint.7.home                  bit
   halui.joint.7.is-homed              bit
   halui.joint.selected.home           bit  // pin for homing the selected joint
   halui.joint.selected.is-homed       bit  // status pin telling that the selected joint is homed
   halui.joint.x.on-soft-min-limit     bit
   halui.joint.x.on-soft-max-limit     bit
   halui.joint.x.on-hard-min-limit     bit
   halui.joint.x.on-hard-max-limit     bit
     (x = 0..7, selected)
   halui.joint.x.has-fault             bit
     (x = 0..7, selected)
   halui.joint.select                  u8   // select joint (0..7)           - internal halui
   halui.joint.selected                u8   // selected joint (0..7)         - internal halui
   halui.joint.x.select                bit  // pins for selecting a joint    - internal halui
   halui.joint.x.is-selected           bit  // status pin                    - internal halui
DONE - jogging:
halui.jog.speed float //set jog speed
   halui.jog.0.minus                   bit
   halui.jog.0.plus                    bit
   ..
   halui.jog.7.minus                   bit
   halui.jog.7.plus                    bit
   halui.jog.selected.minus            bit
   halui.jog.selected.plus             bit
DONE - tool:
   halui.tool.number                   u16  //current selected tool
   halui.tool.length-offset            float //current applied tool-length-offset
DONE: - program:
   halui.program.is-idle               bit
   halui.program.is-running            bit
   halui.program.is-paused             bit
   halui.program.run                   bit
   halui.program.resume                bit
   halui.program.step                  bit
   halui.program.pause                 bit
DONE: - general:
halui.abort bit // pin to send an abort message (clears out most errors)
DONE: - feed-override
   halui.feed-override.value           float //current FO value
   halui.feed-override.scale           float // pin for setting the scale on changing the FO
   halui.feed-override.counts          s43   //counts from an encoder for example to change FO
   halui.feed-override.increase        bit   // pin for increasing the FO (+=scale)
   halui.feed-override.decrease        bit   // pin for decreasing the FO (-=scale)
DONE: - spindle-override
   halui.spindle-override.value           float //current SO value
   halui.spindle-override.scale           float // pin for setting the scale on changing the SO
   halui.spindle-override.counts          s43   //counts from an encoder for example to change SO
   halui.spindle-override.increase        bit   // pin for increasing the SO (+=scale)
   halui.spindle-override.decrease        bit   // pin for decreasing the SO (-=scale)
There is a lot of button and display handling logic written into each of the GUI systems. Writing one of these systems is not simply a matter of making a button and connnecting it to an NML message. For this reason we need to look at sample hardware human machine interfaces and compare their operation with what we are writing here.
JohnK? gave me an older AB control that I'll use for the first sample panel. Working left to right the buttons and pots are grouped like this. I'll put an (okay) by the stuff that is directly handled by the pins that have been identified in the source code above.
        	auto
        	MDI
        	Manual
        	Increment
        	Continuous
        	Handwheel
        	Home
These are manual mode operations. The incremental v continuous jog stuff is handled by different NML messages, at least as seen from the gui side of emcsh.
IMO we will want to keep this distinction. While the increment to be jogged is not defined system wide, we will probably need some way, perhaps something like hal blocks that assign distances to a set of pins or params so that changing the increment can be done by HAL pins.
Handwheel. For this we need the ability to select the target axis. I'm not convinced that handwheel communication/connection can be handled only within HAL. We need to clarify the effect on things like following error of a HAL geared handwheel. The alternative is a jog increment command for each handwheel pulse. How does trajectory planning and max accel and max vel come into play here?
This panel treats home as a mode rather than as a single per-axis button press. When home mode is active, pressing an axis button in the direction away from the home switch causes a jog away. Pressing it in the direction of the home switch causes a home switch search. Several variations of these button presses are possible. This can all be handled within CL. None of it is trivial.
        	+x
        	+y
        	+x
        	+4
        	traverse
        	-4
        	-x
        	-y
        	-z
Holding the traverse button causes jogs at rapid, otherwise the jog speed is dependent upon the selected speed of the next set of buttons. Once again this points to the need for float or int parameters that can be assigned to HAL pins for selection. CL can handle some of these variables but I'm not sure just how capable it is. (rayh need to do some testing)
        	Low 1x
        	Medium Low 10x
        	Medium 100x
        	Medium High 1000x
        	High 10000x
The names of these buttons are ambiguous at best. Is this units or encoder-counts/stepper-pulses? Whatever they are, they represents values for some variable. While handwheel is active they are the pulse multiplier variable. While incremental jog is active they are the possible increments.
        	F1
        	F2
        	F3
        	F4
        	F5
        	F6
        	F7
        	F8
The computer panel of the AB control had a full set of function keys so my assumption is that these represented other higher order functions than our ordinary keyboard keys. Perhaps they represent macros for things like manual tool change or pallet change, etc. AJ: maybe they can be user-assigned
        	Pot 50% to 120%
        	Buttons
        		ccw
        		cw
        		off
Spindle speed override isn't even an nml message yet much less a HAL ready float.
        	Pot 0% to 150%
        	Override Buttons
        		F1
        		25
        		50
        		100
        	Off (okay)
        	On (okay
        	Estop-Reset (okay)
        	Estop twist-to-release (okay & no, use iocontrol for ESTOP input)
        	Cycle Start
        	Single Block
        	Cycle Stop
Since the machine on function is really dependent upon the state of estop, we should be able to implement the estop reset from this panel using the on/off pin. The mushroom head twist-to-release will be external motor power
I'd like to consider making this panel work with EMC2. Most all of these buttons are illuminated and would show EMC status for those things that have an EMC status.
Quite a few of these can be handled inside the HAL or with CL and the pins identified. There are a few exceptions that will need to be added.
![[Home]](/chips.gif)