![[Home]](/chips.gif) Using A Joypad To Move Your CNC Machine
Using A Joypad To Move Your CNC Machine|
A much simpler way to use a joypad is described here: http://wiki.linuxcnc.org/cgi-bin/emcinfo.pl?Simple_Remote_Pendant |
|
A much simpler way to use a joypad is described here: http://wiki.linuxcnc.org/cgi-bin/wiki.pl?Simple_Remote_Pendant |
|
[Here] is how to check if your joypad outputs the right values. |
|
[Here] is how to check if your joypad outputs the right values. |
|
Of course writing a new hal component that converts directly the float input from joypad axis to an integer counter output is possible (and easy), but this requires more knowledge, while the method described here only requires components that are already provided with EMC2. Also using that method it is easy to update the system from joypad to a jogwheel. If you are interested in how to write the new hal component described, [here] you will find instructions. |
|
In the second example we will use only one button to toggle flood on and off. To do that we will use [Halui]. Halui provides a lot of HAL pins to command some EMC2 functions. To use Halui you've to add the line HALUI = halui just after the line [HAL] in your .ini configuration file. |
|
In the second example we will use only one button to toggle flood on and off. To do that we will use [Halui]. Halui provides a lot of HAL pins to command some EMC2 functions. To use Halui you've to add the line HALUI = halui just after the line [HAL] in your .ini configuration file. |
Note that the joystick component is now deprecated and replaced by "input" and that that halui now has analog jog inputs. A much simpler way to use a joypad is described here: http://wiki.linuxcnc.org/cgi-bin/wiki.pl?Simple_Remote_Pendant
Using the component [hal_joystick] it is possible to move your CNC machine with a joystick or joypad. I used a joypad because it has four axes while standard joysticks would have only two.
Why use a joypad?
I've used a joypad like this, made in China, bought about $5 on ebay
it has four analog axes, 12 buttons and the possibility to switch from analog to digital output. With analog you will be able to move your machine proportionally to the little joysticks movements, while the digital input is like an on-off command. With the digital output you can also use the pad on the left. I'm pretty sure that better results in terms of sensibility and precision could be obtained with a higher quality joypad.
In order to work with the hal file I'm going to describe, the joypad axes *must* have the 0 at the center, so give float positive values on one side and negative on the other.
[Here] is how to check if your joypad outputs the right values.
If everything was right, let's understand how it works.
Emc2 provides a sim-encoder and an encoder hal components. More about them can be found [here]. The component sim-encoder is a simulated quadrature rotary encoder. It has an input pin for the rotational speed of the simulated shaft and two output pins for the Phase-A and Phase-B quadrature signals. The component encoder is actually a *decoder* for quadrature signals generated by a rotary encoder. So it has two input pins for Phase-A and Phase-B and an output pin that gives a signed integer that represents the count of impulses. The idea is actually very simple: link the joypad axis pin, that outputs a float value, to the speed pin of the sim-encoder, now link its Phase-A and Phase-B output to the correspondent input in the encoder. Its output will give the counts that will be linked to the axis jog count pin and will let your machine move. Repeat this for X Y and Z. The scheme below shows the hal configuration for X axis:

Of course writing a new hal component that converts directly the float input from joypad axis to an integer counter output is possible (and easy), but this requires more knowledge, while the method described here only requires components that are already provided with EMC2. Also using that method it is easy to update the system from joypad to a jogwheel. If you are interested in how to write the new hal component described, [here] you will find instructions.
Now we will examine the hal file needed to do that. If you're still not familiar with HAL, I suggest you to read the [Hal Manual] that has very helpful tutorials in it that allow you to understand very well how HAL works.
First of all, load the components we will use:
  loadusr hal_joystick -d /dev/input/js0 -p joypad
  loadrt encoder num_chan=3
  loadrt sim_encoder num_chan=3
I'm assuming that your joypad is in /dev/input/js0, if not, please change the line according to your configuration.
Now we link all the three used joypad axes to the speed pin of the simulated encoders:
  net velX joypad.axis.0 => sim-encoder.0.speed
  net velY joypad.axis.1 => sim-encoder.1.speed
  net velZ joypad.axis.3 => sim-encoder.2.speed
Now link the simulated encoder Phase-A and Phase-B to the encoder component for X Y and Z:
  net XA sim-encoder.0.phase-A => encoder.0.phase-A
  net XB sim-encoder.0.phase-B => encoder.0.phase-B
  net YA sim-encoder.1.phase-A => encoder.1.phase-A
  net YB sim-encoder.1.phase-B => encoder.1.phase-B
  net ZA sim-encoder.2.phase-A => encoder.2.phase-A
  net ZB sim-encoder.2.phase-B => encoder.2.phase-B
And finally, link the encoder counts pin to the axis jog counts pin for X Y and Z:
  net countX encoder.0.counts => axis.0.jog-counts
  net countY encoder.1.counts => axis.1.jog-counts
  net countZ encoder.2.counts => axis.2.jog-counts
After all links are done, let's set some parameters, those are the default values, if you feel need to change them, do it accordingly (a - before the sim-encoder.<n>.scale will change the direction if needed):
  setp encoder.0.position-scale            1
  setp encoder.0.x4-mode         TRUE
  setp encoder.1.position-scale            1
  setp encoder.1.x4-mode         TRUE
  setp encoder.2.position-scale            1
  setp encoder.2.x4-mode         TRUE
  setp encoder.capture-position.tmax            0
  setp encoder.update-counters.tmax            0
  setp sim-encoder.0.ppr     00000064
  setp sim-encoder.0.scale            1
  setp sim-encoder.1.ppr     00000064
  setp sim-encoder.1.scale            1
  setp sim-encoder.2.ppr     00000064
  setp sim-encoder.2.scale            1
  setp sim-encoder.make-pulses.tmax            0
  setp sim-encoder.update-speed.tmax            0
And now enable the jog for the X Y and Z axis:
  setp axis.0.jog-enable TRUE
  setp axis.1.jog-enable TRUE
  setp axis.2.jog-enable TRUE
Last task to do, attach the realtime functions to the threads (base-thread -- fast functions, servo-thread -- slow)
  addf encoder.capture-position servo-thread
  addf sim-encoder.update-speed servo-thread
  addf encoder.update-counters base-thread
  addf sim-encoder.make-pulses base-thread
Now you could use this hal file to jog. Just save it for example with the name pad.hal and add a line HALFILE = pad.hal at the end of the [HAL] section of your .ini configuration file.
BUTTONS
Now we are going to attach some functions to the joypad buttons. We will see two examples, in the first we will use two buttons to set the jog scale parameter; pressing the first button will set it to 0.1, pressing the second will set it to 0.01. In the second example we will use only one button to toggle flood on and off. To do that we will use [Halui]. Halui provides a lot of HAL pins to command some EMC2 functions. To use Halui you've to add the line HALUI = halui just after the line [HAL] in your .ini configuration file.
Jog-Scale buttons
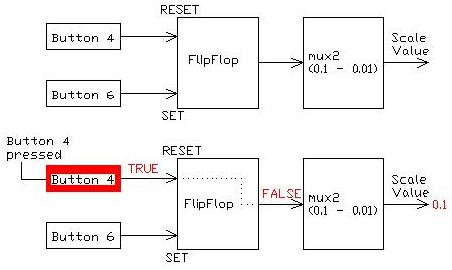
We set two buttons, button 6 and button 4 to change the jogscale value. To do that we use two HAL components, a flipflop and a two values selector mux2. We will link button 6 and button 4 pins to the flipflop set and reset pins. When pressing button 4 flipflop will output FALSE and when pressing button 6 it will output TRUE. We will send those signals to the mux2 selector that will return the first value when receiving FALSE and the second when receiving TRUE. The scheme below explain how it works:

Let's see how to do that with HAL:
First load components:
  loadrt mux2
  loadrt flipflop
Create links between buttons and flipflop:
  net button4 joypad.button.4 => flipflop.0.reset
  net button6 joypad.button.6 => flipflop.0.set
Create links between the mux2 output (jog-scale value selected) and jog-scale pins for X Y and Z axis:
  net jogscale mux2.0.out => axis.0.jog-scale
  net jogscale mux2.0.out => axis.1.jog-scale
  net jogscale mux2.0.out => axis.2.jog-scale
Set default parameters values for flipflop and mux2:
  setp flipflop.0.tmax         3750
  setp mux2.0.tmax         3601
Set the two wanted scale values in the mux2:
  setp mux2.0.in0          0.1
  setp mux2.0.in1          0.01
as always, attach realtime functions to threads:
  addf flipflop.0 servo-thread
  addf mux2.0 servo-thread
Flood button
We now set a button, button 7, to start and stop flood. To do that we will use three HAL components, two and2 and one not. We will use three halui pins for that:
  halui.flood.on           to start flood
  halui.flood.off          to stop flood
  halui.flood.is-on        TRUE when flood is on FALSE if it is off
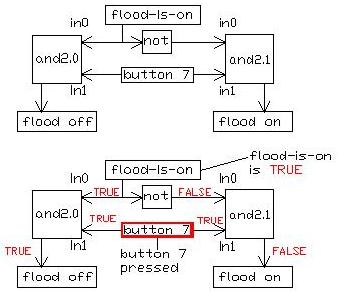
We will link the flood.is-on pin to the and2.0 in0 pin, will use the not component to invert the flood-is-on pin and send the output to the and2.1 in0 pin. Now we will link the button 7 pin to the and2.0 and and2.1 in1 pin. In this way, if the flood-is-on is TRUE, and.0 in0 will be TRUE, and.1 in0 will be FALSE, when we press the button, and.0 and and.1 in1 will be TRUE and so the and.0 will output TRUE while and.1 will output FALSE. So we will link and.0 output to halui.flood.off pin and the and.1 output to the halui.flood.on pin. the scheme below explain how it works:

Let's type the HAL commands to do that:
First load the components:
  loadrt and2 count=2
  loadrt not
Link the flood-is-on halui pin to the and.0 in0 pin and the not in pin:
  net flood-is-on halui.flood.is-on => and2.0.in0
  net flood-is-on halui.flood.is-on => not.0.in
Link the not output to the and.1 in0 pin:
net not-flood-is-on not.0.out => and2.1.in0
Link button 7 to the and.0 and and.1 in1 pin:
  net button7 joypad.button.7 => and2.0.in1
  net button7 joypad.button.7 => and2.1.in1
Link the halui flood.off and flood.on pins to the and.0 and and.1 output:
  net floodOff and2.0.out => halui.flood.off
  net floodOn and2.1.out => halui.flood.on
Last thing, attach the realtime functions to threads:
  addf and2.0 servo-thread
  addf and2.1 servo-thread
  addf not.0 servo-thread
Work DONE! In the same way you can attach other functions to buttons as you like.
If you want to donwload it, the complete halfile is [here]. If you want to use it don't forget to add HALFILE = joypad.hal at the end of the [HAL] section of your .ini configuration file.
Have Fun!
Manfredi