-
- 1. Different Coordinate-system affecting gcodes
-
-
- 1.1. G5x work coordinate systems
-
- 1.2. G92 coordinate offset
-
- 1.3. G43 Tool offset
-
- 1.4. Are all combined together
-
2. AXIS GUI functions for setting Home and Offset-
-
- 2.1. Home and Home All
-
- 2.2. Touch Off
-
- 2.3. Zero Coordinate System
-
3. So if you're lost, what should you do-
- 4. What should you do to set your origin on material
-
- 5. Other reasons for nonzero coordinates at start
-
- 6. Features from other control systems not LinuxCNC related
-
-
- 6.1. G52 coordinate offset (not yet implemented)
-
- 6.2. Common work coordinate offset (not yet implemented)
-
This page is an overview of the different things that affect the relationship
between machine coordinates and gcode coordinates. For more information on
topics discussed here, see the gcode reference in the user manual.
1. Different Coordinate-system affecting gcodes
Typical coordinate systems used include:
- Machine coordinates. These cannot be changed from gcode. You can access these with a "G53" override.
- G54 coordinates, typically used for the workpiece. This is the default coordinate system.
- Write to the G54 coordinate origin using "G10 L2 P1 X0 Y0 Z0". This overwrites the G54 origin with the given coordinates.
- G55 ... G59.3 coordinates, typically used for sub-parts
- Switch to G55 coordinates using "G55". Switch back to G54 with "G54".
- G43 coordinates, typically used to compensate for tooling lengths.
- Turn off G43 shift using "G49".
- G92 coordinates, typically used for ganged fixtures
- Write to the current G92 coordinate origin using "G92 X0 Y0 Z0". This forces the current location to have the given coordinates in G92.
- Clear G92 coordinates to machine zero using "G92.1".
1.1. G5x work coordinate systems
G5x coordinate systems
| Coordinate system | Set by
|
|---|
| G54 | G10 L2 P1
|
| G55 | G10 L2 P2
|
| G56 | G10 L2 P3
|
| G57 | G10 L2 P4
|
| G58 | G10 L2 P5
|
| G59 | G10 L2 P6
|
| G59.1 | G10 L2 P7
|
| G59.2 | G10 L2 P8
|
| G59.3 | G10 L2 P9
|
At any time, one G5x coordinate system is in effect. The G54 coordinate is in effect at LinuxCNC startup and after read ahead reaches M2.
G5x offsets are saved in the "var file" when exiting LinuxCNC and will retain their values until set via the below methods.
The coordinate system offsets are modified by G10 L2 Pn
(axes). For instance, G10 L2 P1 Y-2 changes the G54
coordinate system so that its Y0 is equivalent to Y-2 in the machine
coordinate system.
In the AXIS user interface, the "touch off" button can be used to modify a G5x
coordinate system. The value entered in the "touch off" dialog is not the
same as the value given to G10 L2. For instance, entering -2 means: "change
the coordinate system so that the current machine position is -2 in this
coordinate system".
Each work coordinate system is relative to the machine zero
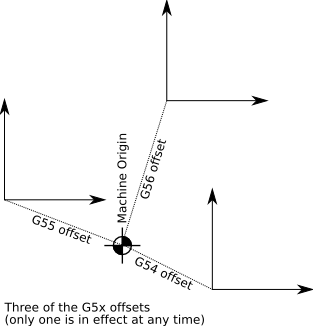
|
G54..G59.3 are "modal", so once a coordinate system is activated it stays
in effect until another code changes the active coordinate system.
M2 activates the G54 coordinate system.
Example:
 G54
 G0 X10.0 Y10.0
 X30.0 Y15.0
Coordinates of gcode example

|
1.2. G92 coordinate offset
Although there are nine work coordinate systems provided sometimes these are not enough or when they are to be moved for each part and or program a G code can be used to make a shift on the work coordinate.
The G92 coordinate offset is programmed by G92, and also affected by M2, G92.1, G92.2 and G92.3 as documented in [
[1]].
Particularly due to the way the G92 coordinate offset is disabled if the interpreter read ahead reaches M2 or M30.
Many users find that the behaviour of G92 is confusing.
The main key point on G92 is to remember, G92 shifts
ALL the work coordinate system based on current tool position.
This offset value will move all work coordinate systems (G54,G55 etc). The G92 offset can be cleared, unapplied, or reapplied using the extended G92 codes; see the link above.
Example:
G54 --- Work coordinate system G54
G00 X25.0 Y20.0 --- Move the tool to X25, Y20
G92 X0.0 Y0.0 -- Set G92 to our tools location
Effects of the above example

this how now set a new known location for our G54 location but
REMEMBER this has also applied an offset of X25 and Y20 respective to all other work coordinate systems zero locations.
to set the location back to old part zero location we need to move the tool back so (remembering this will change for all work coordinate systems)
G00 X-25.0 Y-20.0 -- rapid tool to X-25 Y-20 (relative to current G92 location)
G92 X0.0 Y0.0 -- set G92 to our tools location
note: the above will work as long as we have not moved the tools location.
(there is now a G92 cancel feature in the axis menus: Machine - Zero coordinate system - G92 this will move G92 back to original value)
as you can see, we must always know where the G92 is, and our tools location relative. it can quickly become confusing remembering where we have been while moving the G92 multiple times through out a program.
one other down fall to G92 is when running a program, and cutter brakes or we have to stop for some unknown reason.
if we have
N20 G00 X0.0 Y0.0 -- go to part zero
N30 01001 call -- call sub program 1001
N40 G00 X5.0 Y5.0 -- move tool X5 Y5 from part zero
N50 G92 X0.0 Y0.0 -- set part zero here
N60 01001 call -- call sub program 1001 again in new location
N70 G00 X-5.0 Y-5.0 -- move tool back to "old" part zero
N80 G92 X0.0 Y0.0 -- set part zero here
NOTE: we could have issued N70 and N80 as
N70 G00 X0.0 Y0.0
N80 G92 X-5.0 Y-5.0
if the program is cancelled/stopped during N60 - N70 our Part zero will not be restored and when our program is rerun we will start cutting in the wrong place as we will cut where our 2nd part was, and then move to a new location.
you must cancel the G92 if you are to resume the above program before a rerun is issued.
G92 X0 Y0 would not reset the above because it would reset to the tools current position, we must move the tool to our 1st part zero location then issue a G92 X0 Y0.
G92 can be come handy when using a 4th axes for a quick & dirty axes reset, if we are doing a long 4th axis job if we want to cut a new part it would be very time consuming to unwind a large rotary value, so we can issue a G92 A0 (assuming A is rotory axis) this will reset our axis to zero. (note: if you want to recut the part you must "unwind" the axis)
1.3. G43 Tool offset
When G43 is in effect, the Z coordinate is modified by the tool
length. On lathes, G43 can offset both X and Z
1.4. Are all combined together

All three of these (G5x coordinate system (one is always in effect), G92
coordinate offset (unless disabled by G92.1 or G92.2 or M2 or M30), and G43 tool
offset (when enabled)) are combined to get the coordinate value
shown on the AXIS DRO when Relative coordinates are selected. When the Relative coordinates are different than the Machine coordinates,
AXIS draws a cyan icon at the machine origin and the tricolor coordinate
system marker at the origin of the relative coordinate system.
2. AXIS GUI functions for setting Home and Offset
2.1. Home and Home All
In a machine with home switches, use these home switches to move the axis to its home location.
In a machine without home switches, notify LinuxCNC that the current axis position has been manually jogged to the home position.
Even in a machine without home switches, you should establish and use a home position. After homing, the inifile soft limits are applied, so you can be confident that the machine will not walk the table right off the end of the leadscrew.
After invoking Home, the value shown could be nonzero for several
reasons, including
 A coordinate system or offset is being added to the axis value
 The inifile HOME is not 0
2.2. Touch Off
Touch Off is a way of setting the G54...G59.3 coordinate system based on the
current location of the axis and the entered value. Touch Off
ignores G92 coordinate offsets even if they are currently in effect.
2.3. Zero Coordinate System
Zero Coordinate System in the Machine menu sets a G54...G59.3 coordinate system offset to no offset.
3. So if you're lost, what should you do
Having trouble getting 0,0,0 where you want it for your gcode Start by getting rid of all the sources of offsets
 Move to the machine origin.         MDI G53 G0 X0Y0Z0 (A0B0C0)

 Clear the G92 coordinate offset.    MDI G92.1

 Use the G54 coordinate system.      MDI G54

 Set the G54 coordinate system to be identical to the machine  coordinate system.                  MDI G10 L2 P1 X0Y0Z0 (A0B0C0)

 Turn off tool offsets.              MDI G49

 Turn on Relative coordinate display from the menu
now, you should be at machine origin (0,0,0), and the relative
coordinate system should be the same as the machine coordinate system. You can now set your origin on the material.
4. What should you do to set your origin on material
Insert the tool you will use during origin setting, and enable its tool offset.
MDI G43 H-For each axis,
 Jog to a known or measurable location with respect to the material

 Invoke Touch Off, and enter the current position with respect to the material.
For example, the following procedure can be used to set the material origin using an .200-diameter edge finder and a 0.500 dowel pin
 Jog so that the edgefinder touches the left side of the workpiece.
Touch off X to -.1 inches.  (this can also be entered as -.22)
 Jog so that the edgefinder touches the front side of the workpiece.
Touch off Y to -.1 inches.

 Place the tool above the work and jog up slowly until a 0.5 dowel pin just rolls under the tool.  touch off Z to 0.5.

 Also see the video [How to Use an Edge Finder] AKA [Using an Edge Finder - Tormach CNC]
5. Other reasons for nonzero coordinates at start
If you specified [TRAJ]POSITION_FILE, the contents of that file are read at startup and define initial axis positions.
To forget these values once, exit LinuxCNC and remove the file. To never store these values, remove the POSITION_FILE line from your inifile.
6. Features from other control systems not LinuxCNC related
6.1. G52 coordinate offset (not yet implemented)
- -- this feature is not yet implemented into LinuxCNC but the below is an outline of how it would work --
The G52 command works very much like the above G92 when used but is very much more forgiving and operator friendly in use.
G52 works like having a child coordinate system G52 specifies an incremental shift to be added to the part zero location. Each G52 replaced the last G52 command
NOT adding to it.
So to cancel any G52 offset in use, you would simply enter a G52 X0 Y0 Z0.
Just like G92, G52 will specify a local coordinate system shift for all work coordinate offsets (G54 - G92.3) not just the active one.
Unlike G92, G52 is not set based on the tools location, it only adds an incremental shift relative to the work coordinate offset.
The G52 value can be set with the following command from MDI or a part program
G52 followed by an axes word
eg: G52 X50.0 Y0.0 Z0.0 -- would move the X50mm only, all other work coordinate systems stay at there current value.
Example:
G52 X150.0 Y150.0 -- Set G52 150 in X, 150 in Y relative to work coordinate system
G52 X400.0 Y350.0 -- Set G52 400 in X, 350 in Y relative to work coordinate system

notice how axes values are relative to the work coordinate system and not the old G52 coordinate offset.
to reset G52 back to our work coordinate zero we can issue G52 X0 Y0 Z0
Exaple 2: same as the G92 exaple
N20 G52 X0.0 Y0.0 -- set G52 at part zero (work coordinate)
N30 G00 X0.0 Y0.0 -- Go to work coordinate zero
N40 O1001 CALL -- call subprogram 1001
N50 G52 X5.0 Y5.0 -- incremental move G52 X5 Y5 from work coordinate
N60 O1001 CALL -- Call Subprogram 1001
N70 G52 X0.0 Y0.0 -- Set G52 back to part zero (work coordinate)
by cancelling or stopping the program any where and rerunning it our program will start and finish in the correct place, unlike the G92 example above.
A G52 command will cancel a G92 in effect, while a G92 will cancel a G52 in effect.
G52 does not change any Work or machine coordinate system values.
G52 is cancelled when M30 M2 (end of program is read) or the system is reset
There is not lathe code for G52
6.2. Common work coordinate offset (not yet implemented)
- -- this feature is not yet implemented into LinuxCNC but the below is an outline of how it would work --
The Common work coordinate offset value becomes valid for all G5x coordinate values and is added to the machine Zero point.
eg, if we added a external coordinate offset value of X50.0mm Y-10.0mm all our work offsets (G5X) will stand of 50mm in X and -10mm in the Y axis planes respective.
this can be used in effect as a work trimming offset when the same change is needed to be made to all work coordinate offsets.
this should add an incremental shift to the work coordinate systems.
![[Home]](/chips.gif)