Gscreen Development / Docs
Gscreen is a screen for running gcode in linuxcnc.
The mandate for it's development is a more natural screen for machinists and relative ease of customization
I'm open to suggestions and code patches - send them to the linuxcnc dev maillist or post on the forum
-
- 1. Programming Features
-
- 2. Operational Features
-
- 3. Manual Mode Layout
-
-
- 3.1. Estop
-
- 3.2. Mode
-
- 3.3. Menu Level
-
- 3.4. Overrides
-
- 3.5. Graphics
-
- 3.6. Entry spinbox
-
- 3.7. Error status
-
- 3.8. Tool Info
-
- 3.9. Axis selection buttons
-
- 3.10. Vertical action buttons
-
- 3.11. Horizontal action buttons
-
- 3.12. Graphics window
-
- 3.13. DRO
-
4. Preference menu Page-
- 5. Debug menu page
-
- 6. Tool Editor
-
- 7. Manual Mode
-
- 8. MDI Mode
-
- 9. Auto Mode
-
- 10. Embedded Programs
-
- 11. user message dialogs
-
- 12. two monitor support
-
- 13. Installation
-
- 14. Customization options
-

1. Programming Features
programmed in python - powerful and easy to read language
uses GTK screen widgets - GTK is common, powerful, supports GLADE, has lots of examples and looks natural in Ubuntu
uses GLADE for screen layout - GLADE is a point and click screen widget editor -you can easily edit the layout with out programming.
uses GLADEvcp widgets - GLADEvcp widgets are designed for machine control and include hooks for HAL pins
Theme-able - GTk screens can have themes just like the desktop. It changes the look and feel of the screen. Themes can be edited separately
2. Operational Features
Designed with a touch screen in mind though keyboard is needed for MDI and Gcode editing so far.
has a graphical display of the tool movement like AXIS (it use some of the same code)
can have two display screens (monitors)
Can edit Gcode on screen
supports XYZA mills and XZ lathes
Hoping for a more natural industrial look and feel
supports embeded windows such as webcams
has two user message systems that can be accessed from HAL pins the error status line on top and a dialog system.
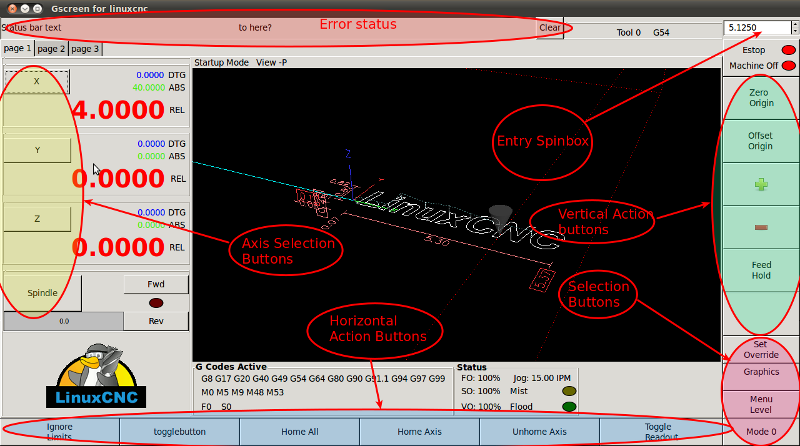
3. Manual Mode Layout
3.1. Estop
In the top right you will see the Estop button with two LEDs.
Press once to get out of Estop, again to turn the machine on, and again to Estop /Machine
? off
3.2. Mode
On the bottom right is the mode button
This switches between Manual, MDI and Auto mode.
Each one has different button options that will show up.
3.3. Menu Level
The Menu button is right close to the bottom
Double clicking this will switch the Main screen from the running, preference and debugging screens
at this time you can also switch between these tabs at the upper left (you can see the tabs showing)
when in auto mode single clicking this will switch the center tab window between any available tabs
Any optionally loaded tab programs will be shown here
3.4. Overrides
This button is on the right near the bottom
pressing this changes the horizontal action buttons along the bottom for selecting an override to change
Use the vertical action buttons to change the settings
The + and - buttons will raise/lower the rate by 5%
the zero button will zero the rate
The set button will set the rate to the closes whole percent of the entry spinbox
click the override button again to return to the main screen
3.5. Graphics
This brings up the graphic screen options on the bottom action buttons
3.6. Entry spinbox
This is on the top right
Used for setting Axis origin and overrides
Double clicking this will bring up a calculator entry dialog
While the calculator is showing, the entry spinbox is ignored and the calculator display will be used
If you close the calculator with the accept button the shown display will be copied to the entry spinbutton
Closing with the cancel button will set the entry spin button with the original value
3.7. Error status
At the top left
This displays the last error linuxcnc or Gscreen detected
User messages can be display here
These will not be cleared unless the clear button is pressed
The clear button only clears the last message, any previous messages will show
error messages will also be displayed with desktop notification bubble
3.8. Tool Info
On the top to the right
This displays the current active tool number and the active user coordinate system
3.9. Axis selection buttons
Allows selection of individual axis for setting of origin,jogging etc
Some actions allow multiple axis to be selected some don't eg. zeroing the origin does jogging does not,
3.10. Vertical action buttons
On the right side
In general these don't change much but allow actions dependent on other selections
there are buttons to zero and set-to-entry's-number
3.11. Horizontal action buttons
These change a lot depending on mode and selection buttons
3.12. Graphics window
The graphics window can be double clicked to hide/show the DRO/axis selection buttons
The mouse, touchscreen and/or buttons can be used to pan/rotate the view
When the DRO/axis selection buttons are hidden the graphics screen's DRO is shown on the left
The offsets can also be shown by selecting that option in the preference screen
Different views and clean up of the plot can be selected by pressing the graphics selection button on the right near the bottom
3.13. DRO
Beside the Axis selection buttons
This displays the absolute / relative and distance to go values for each axis
You can select which one is displayed in large text be pressing the toggle readout button
The color of the text can be selected in the preference screen
Absolute is the machine coordinates
Relative is the current user coordinate system position
DTG is the distance between where the axis is now and where it has been asked to go to
4. Preference menu Page

The preference page records your choices in a hidden file on your home folder (.gscreen_preferences)
most are self explanatory though hiding the pointer put you in touchscreen mode - which changes some behaviour
5. Debug menu page
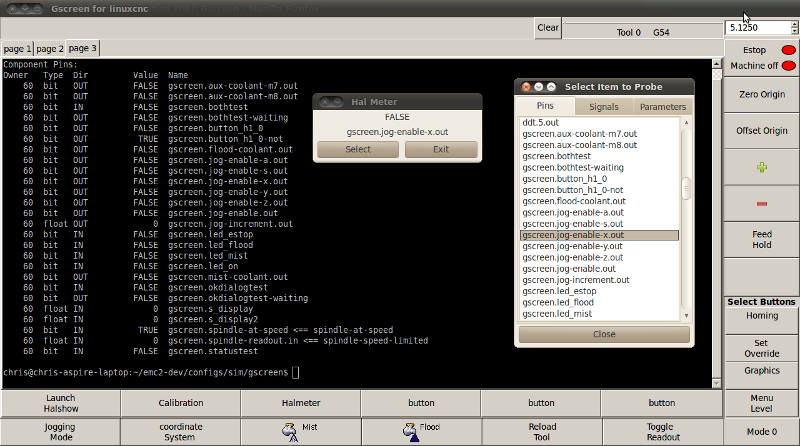
The debug page allows one to issue terminal commands (such as halcmd commands), launch HAL meter and other debugging / investigative tools.
6. Tool Editor
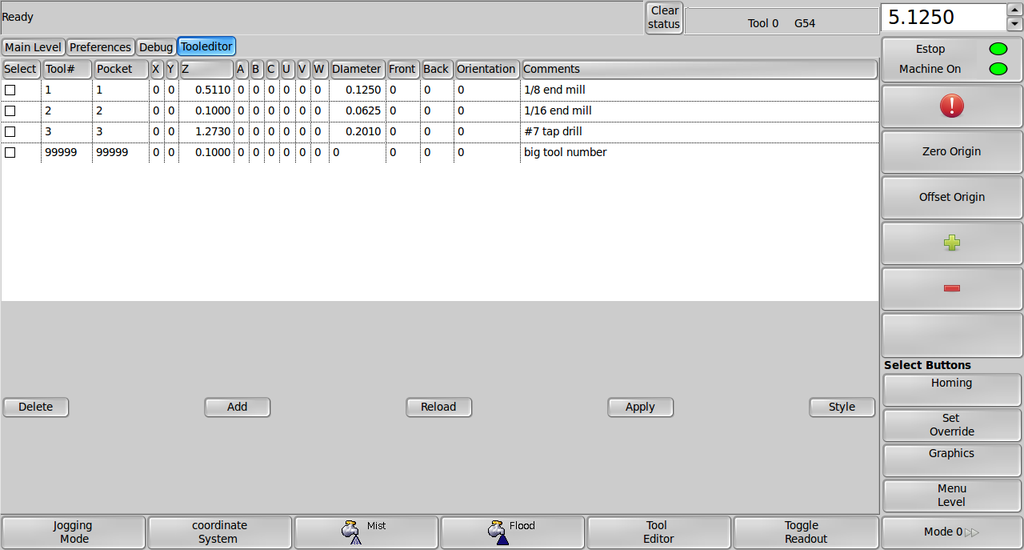
This allows you to make changes to the tool file.
Pressing the style button toggles between lathe specific info and all info.
to edit a line, press the select check box of the tool you wish to edit.
Press the apply button to save the changes, if the apply button is desensitized then linuxcnc cannot register the changes at that moment
Reload will force tooledit to check for changes in the toolfile that may have come from running a gcode file.
7. Manual Mode
In this mode You can:
-Home the machine
-set or zero the origin
-Toggle the DRO readout
-select jog mode.
In jog mode you can jog individual axis with the on screen buttons at the current jog rate
or you can move directly to a position by inputting a number and pressing the 'move to' button
You can start the spindle turning by selecting the fwd or revs buttons (starts at 100 RPM)
If you select the spindle button then pressing the + or - button will change the speed +- 100 RPM
pressing the red stop button (or deselecting the direction button) will stop the spindle
pressing the set at button will set the RPM at the current entry number
There are HAL pins related to jogging that can be used to select a MPG/axis for jogging.
set the overrides including jog increments / continuous speed
-turn the coolants on and off
At anytime you can:
-estop or start the machine
-bring up the calculator (double click the spinbutton in the upper right)
-adjust the overrides
-adjust the view of the graphics plot
-move to a different menu screen
-move to a different mode (MDI or Auto) as long as you have finished homing
8. MDI Mode
-run mdi command by typing them in the MDI text entry and pressing the checkmark
9. Auto Mode
For running CNC g code programs
Horizontal buttons:
-you can load a new file by clicking the file folder. filter programs can be loaded too
-you can set/unset optional block and optional stop
-if you have edited the gcode you can save or save-as the changes (in fact you must save the changes to register them)
-You can reload the graphics plot
-by pressing the next tab you will cycle through the tab_box tabs
Vertical buttons:
-you can stop, start, pause and single-step the program.
-The full graphics button toggles hiding the DRO and gcode display panels (which enlarges the graphics panel)
-By pressing the edit button the Gcode display enlarges and one can edit it. You have to save the changes for linuxcnc to register the changes
-Overrides, graphic views and menu level can be adjusted at anytime.
10. Embedded Programs

You can embed programs into gscreen just like AXIS and TOUCHY
The syntax is slightly different and you can embed in notebooks tabs as well as hbox and vboxs
EMBED_TAB_NAME = Embedded 1
EMBED_TAB_LOCATION = vcp_box
EMBED_TAB_COMMAND = gladevcp -x {XID} -t Redmond vcp_box.glade
EMBED_TAB_NAME = Embedded 2
EMBED_TAB_LOCATION = notebook_mode
EMBED_TAB_COMMAND = gladevcp -x {XID} -t Redmond gladevcp-test.ui
TAB_NAME is the label if yousing a notebook tab
TAB_LOCATION is the widget name in the glade file
COMMAND works the same as the other screens
<br.
There is a sample INI file in sim/gscreen
11. user message dialogs
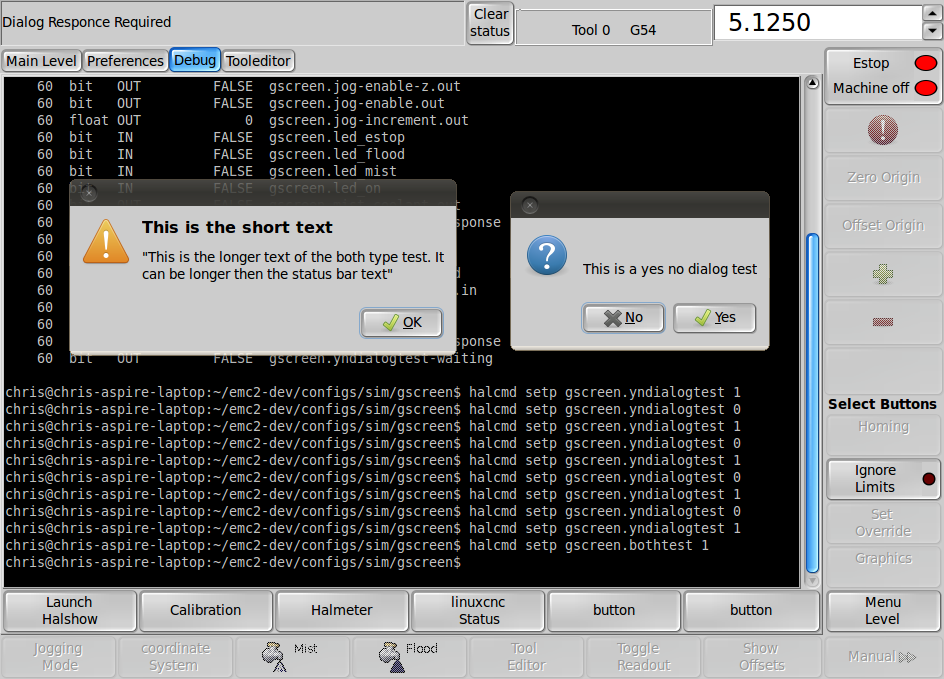
Gscreen can build simple HAL pin controlled dialog messages
You can have the message display as a separate dialog box or just in the status bar or both
Ok dialogs require the user to acknowledge them
This will set a HAL pin to relay the acknowledgement
status messages will display in the status bar when the HAL pin is set true
MESSAGE_BOLDTEXT = NONE
MESSAGE_TEXT = This is a statusbar test
MESSAGE_TYPE = status
MESSAGE_PINNAME = statustest
MESSAGE_BOLDTEXT = NONE
MESSAGE_TEXT = This is an ok dialog test
MESSAGE_TYPE = okdialog
MESSAGE_PINNAME = okdialogtest
MESSAGE_BOLDTEXT = NONE
MESSAGE_TEXT = This is an yes/no dialog test
MESSAGE_TYPE = yesnodialog
MESSAGE_PINNAME = yesnodialogtest
12. two monitor support
By building glade file for the second screen (gscreen2.glade), there are options to move it to the second monitor
if using a touch screen you must limit the touch screen to it's monitor - search the web for touchscreen calibration
13. Installation
Here we will cover the basics of using Gscreen in linuxcnc.
- INI file
- [DISPLAY] section
- DISPLAY = gscreen
There are options -c skinname and -d
-c skinname tells Gscreen to search for a custom GLADE screen file and custom handler file with the name skinname.
The files searched for would be skinname.glade, skinname2.glade, and skinname_hander.py
If either of the skinnname glade file are missing the standard files will be used.
-d tells Gscreen to print extra debug messages to the terminal.
Gscreen exports a few HAL pins:
This pins are self explanatory - other then they can be unselected in Gscreen:
gscreen.flood-coolant.out
gscreen.mist-coolant.out
These can be selected in Gscreens preference file
Together this allows 4 coolant options
This was a request from my main tester if you were wondering why
gscreen.aux-coolant-m7.out
gscreen.aux-coolant-m8.out
Ignore these:
gscreen.button_h1_0
gscreen.button_h1_0-not
Jog enable for each axis - will be true in jogging mode and in jogging mode
Jog enable will be true when in jogging mode
jog increment is the current jog increment selected in Gscreen - useful for MPG jogging
gscreen.jog-enable-x.out
gscreen.jog-enable-y.out
gscreen.jog-enable-z.out
gscreen.jog-enable.out
gscreen.jog-increment.out
Ignore this pin:
gscreen.s_display
This is from the second screen sample spindle readout -float
gscreen.s_display2
Connect to this to have the spindle at speed LED light up -bit
gscreen.spindle-at-speed
This is the pin to connect to for the spindle speed bar display -float
gscreen.spindle-readout.in
These are for using the manual-toolchange message dialog:
gscreen.change-tool
gscreen.tool-changed
gscreen.tool-number
There will be more pins if you use other options such as user messages, or custom screens with extra gladevcp widgets
If you use embedded gladevcp panels their pinname will be different.
When first started Gscreen prints it"s available HAL pins on it's debug page.
14. Customization options

This is rapidly evolving...:
One thing to remember is if you use a custom screen option YOU are responsible for fixing it (if required) when updating linuxcnc.
if present, local glade files in the config folder will be loaded instead of the stock glade files
There is a switch to set set the base name -c name or if you name them gscreen.glade you don't need the switch
Note when making changes it is far easier to add widgets then subtract widgets and still have the screen work properly
making objects 'not visible' is one way to change the display without getting errors - this won't always work some widgets will be set visible again
Changing the names of gscreens regular widgets is probably not gonna work well either - but moving a widget while keeping the name is usually workable
You can now tell Gscreen to just load the glade file and not connect it's internal signals to it - This allows gscreen to load any GTK builder saved glade file
This means you can display a completely custom screen
If present a handler file named gscreen_handler.py (or skinname_handler.py if using the switch) will be loaded and registered
only one file is allowed
There is a sample config called gscreen-gaxis
please see the gladevcp write-up about handler files
Here is gaxis and it's handler file:


There are special functions Gscreen checks the handler file for.
- initialize_widgets(self):
You can use this to set up any widgets and or call Gscreen's widget initialization function by adding 'self.gscreen.initialize_widgets' or add 'pass' so no widgets are initialized.
- initialize_pins(self):
Same idea for this - it initializes HAL pins
- periodic(self)
This is called every 50 milliseconds - use it to update your widgets/HAL pins. you can call Gscreen regular periodic afterwards too, self.gscreen.update_position() or just add pass to not update anything.
- connect_signals(self):
Same idea again. If you are using a completely different screen the default Gscreen you must add this or gscreen will try to connect signals to widgets that are not there. Gscreen's function is called with self.gscreen.install_signals()
- on_tool_change(self,widget)
You can use this to override the manual tool change dialog -this is called when 'gscreen.tool-change' changes state.
- dialog_return(self,widget,displaytype,pinname):
use this to override any user message or manual tool change dialog. Called when the dialog is closed
![[Home]](/chips.gif)