Gscreen Development / Docs
Gscreen is a screen for running gcode in linuxcnc.
The mandate for it's development is a more natural screen for machinists and relative ease of customization
I'm open to suggestions and code patches - send them to the linuxcnc dev maillist or post on the forum
-
- 1. Programming Features
-
- 2. Operational Features
-
- 3. Layout
-
-
- 3.1. Estop
-
- 3.2. Mode
-
- 3.3. Menu Level
-
- 3.4. Overrides
-
- 3.5. Graphics
-
- 3.6. Entry spinbox
-
- 3.7. Error status
-
- 3.8. Tool Info
-
- 3.9. Axis selection buttons
-
- 3.10. Vertical action buttons
-
- 3.11. Horizontal action buttons
-
- 3.12. Graphics window
-
- 3.13. DRO
-
4. Startup Mode-
- 5. Manual Mode
-
- 6. MDI Mode
-
- 7. Auto Mode
-
1. Programming Features
programmed in python - powerful and easy to read language
uses GTK screen widgets - GTK is common, powerful, supports GLADE, has lots of examples and looks natural in Ubuntu
uses GLADE for screen layout - GLADE is a point and click screen widget editor -you can easily edit the layout with out programming.
uses GLADEvcp widgets - GLADEvcp widgets are designed for machine control and include hooks for HAL pins
Theme-able - GTk screens can have themes just like the desktop. It changes the look and feel of the screen. Themes can be edited separately
2. Operational Features
Designed with a touch screen in mind though keyboard is needed for MDI and Gcode editing so far.
has a graphical display of the tool movement like AXIS (it use some of the same code)
can have two display screens (monitors)
Can edit Gcode on screen
supports XYZA mills and XZ lathes
Hoping for a more natural industrial look and feel
supports embeded windows such as webcams
has two user message systems that can be accessed from HAL pins the error status line on top and a dialog system.
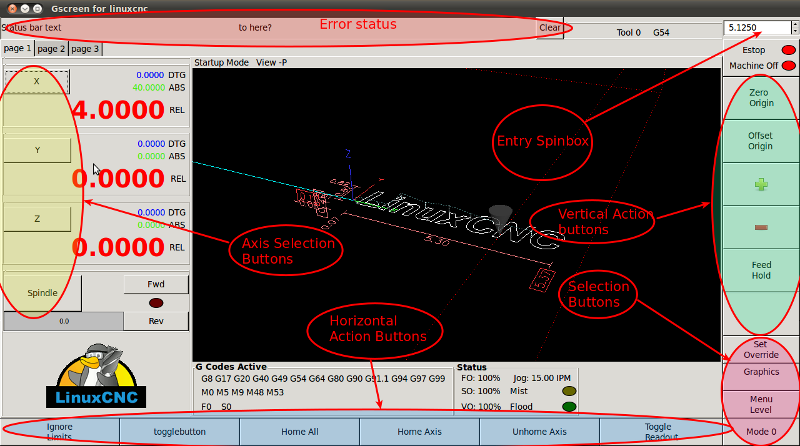
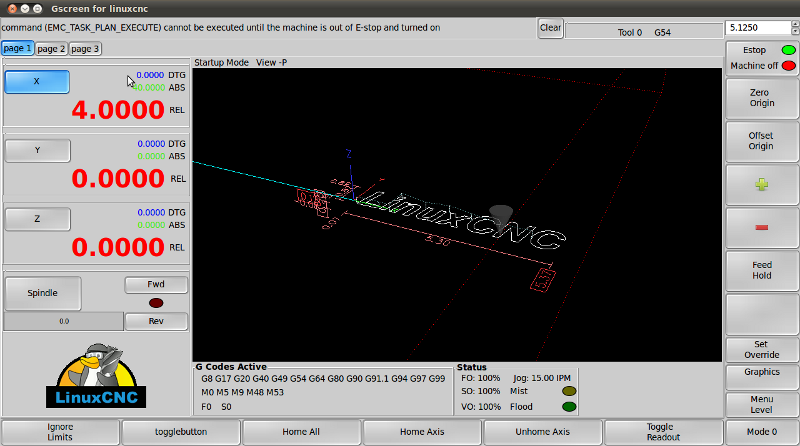
3. Layout
3.1. Estop
In the top right you will see the Estop button with two LEDs.
Press once to get out of Estop, again to turn the machine on, and again to Estop /Machine
? off
3.2. Mode
On the bottom right is the mode button
This switches between Startup, Manual, MDI and Auto mode.
Each one has different button options that will show up.
3.3. Menu Level
The Menu button is right close to the bottom
Double clicking this will switch the Main screen from the running, preference and debugging screens
at this time you can also switch between these tabs at the upper left (you can see the tabs showing)
when in auto mode single clicking this will switch the center tab window between any available tabs
Any optionally loaded tab programs will be shown here
3.4. Overrides
This button is on the right near the bottom
pressing this changes the horizontal action buttons along the bottom for selecting an override to change
Use the vertical action buttons to change the settings
The + and - buttons will raise/lower the rate by 5%
the zero button will zero the rate
The set button will set the rate to the closes whole percent of the entry spinbox
click the override button again to return to the main screen
3.5. Graphics
This brings up the graphic screen options on the bottom action buttons
This at the moment does not use the vertical action buttons nor allows panning or rotation
You can do that with the mouse though
3.6. Entry spinbox
This is on the top right
Used for setting Axis origin and overrides
Double clicking this will bring up a calculator entry dialog
While the calculator is showing the entry spinbox is ignored and the calculator display will be used
If you close the calculator with the accept button the shown display will be copied to the entry spinbutton
Closing with the cancel button will set the entry spin button with the original value
3.7. Error status
At the top left
This displays the last error linuxcnc or Gscreen detected
User messages can be display here
These will not be cleared unless the clear button is pressed
The clear button only clears the last message, any previous messages will show
3.8. Tool Info
On the top to the right
This displays the current active tool number and the active user coordinate system
3.9. Axis selection buttons
Allows selection of individual axis for setting of origin,jogging etc
Some actions allow multiple axis to be selected some don't eg. zeroing the origin does jogging does not,br>
3.10. Vertical action buttons
On the right side
In general these don't change much but allow actions dependent on other selections
there are buttons to zero and set-to-entry's-number
3.11. Horizontal action buttons
These change a lot depending on mode and selection buttons
3.12. Graphics window
The graphics window can be double clicked to hide/show the DRO/axis selection buttons
The mouse and buttons can be used to pan/rotate the view
When the DRO/axis selection buttons are hidden the graphics screen's DRO is shown on the left
The offsets can also be shown by selecting that option in the preference screen
Different views and clean up of the plot can be selected by pressing the graphics selection button on the right near the bottom
3.13. DRO
Beside the Axis selection buttons
This displays the absolute / relative and distance to go values for each axis
You can select which one is displayed in large text be pressing the toggle readout button
The color of the text can be selected in the preference screen
Absolute is the machine coordinates
Relative is the current user coordinate system position
DTG is the distance between where the axis is now and where it has been asked to go to
4. Startup Mode
In this mode You can:
-Home the machine
-set or zero the origin
-Toggle the DRO to show absolute, relative or distance-to-go
At anytime you can:
-estop or start the machine
-bring up the calculator
-adjust the overrides
-adjust the view of the graphics plot>br>
-move to a different menu screen
-change to the next mode
5. Manual Mode
In this mode you can:
-Toggle the DRO readout
-select jog mode.
In jog mode you can jog individual axis with the on screen buttons at the current jog rate
or you can move directly to a position by inputing a number and pressing the 'move to' button
There are HAL pins related to jogging that can be used to select a MPG/axis for jogging.
if not in jogging mode you can zero or set axis origins or start the spindle turning
-turn the coolants on and off
6. MDI Mode
7. Auto Mode
![[Home]](/chips.gif)