Get to know your hardware - How to do a JTAG boundary scan for a Mesanet 7i43 under Linux Ubuntu 10.10 AMD64
In this short how-to I'd like to show you how to establish communication with your Mesanet 7i43
1. Disclaimer
Use at your own risk.
2. Introduction
Many of todays ICs come with a special bus called JTAG, which is useful for debugging, programming the IC, and development in general. If you have not yet come across
[JTAG], then please do read the Wikipedia article first.
3. Motivation
Last summer, I accidentally killed the
[CPLD] on the 7i43, which is an XC9572XL. I replaced the CPLD on the PCB with a new one. But unlike an
[FPGA], CPLDs have to be programmed.
4. Requirements
Well, there is lots of different hardware out there, so the following is what I used.
- PC with bidirectional parallel port running Linux.
- A parallel port JTAG adapter. I got mine for another FPGA project at ebay.de for EUR 13,- incl. shipping. [datasheet]. There are many other JTAG adapters available, parallel port clones of the Xilinx cables and USB ones, YMMV.
- An FPGA board with a populated JTAG header. I had to solder on a header to the 7i43 and create a small adapter cable from my cheap parallel port JTAG adapter to match the pinout on the 7i43 board.
- Xilinx ISE WebPACK, which contains a program called impact. The download is huge and might take a while. The ISE WebPACK is free as in free beer.
- I personally do not like the Xilinx parallel port driver, since it does not compile on my stock Ubuntu 10.10 AMD64 kernel. Fortunately there is another driver available. Get it this way: git clone git://git.zerfleddert.de/usb-driver
5. Installation
First do check your BIOS. Enable a bidirectional mode, EPP or ECP.
Then install ISE WebPACK.
Compile the usb-driver by running make in its directory. You will certainly want to install compile dependencies first, see the included README.
6. Usage
Check the permissions on your /dev/parport0 first with ls -l /dev/parport0. On Ubuntu, if your user is not in the lp user group then you will need to add your user to this group and log out and log in again. When you log in again, check in your shell with 'id', that you now really belong to the lp group.
In your shell type:
LD_PRELOAD=/path/to/libusb-driver.so impact
And please remember to substitute your own path. Example:
LD_PRELOAD=/home/mx/mesanet_7i43/usb-driver/libusb-driver.so impact
Now you need to set the environment variables for ISE, mine are in /home/mx/Xilinx/12.3/ISE_DS/settings64.sh, so the command is:
source /home/mx/Xilinx/12.3/ISE_DS/settings64.sh
Then start impact in your shell by simply entering:
impact
To speed up the invocation of all this I created a small shell script: impact.bash
#!/bin/bash
source /home/mx/Xilinx/12.3/ISE_DS/settings64.sh
export LD_PRELOAD=/home/mx/mesanet_7i43/usb-driver/libusb-driver.so
/home/mx/Xilinx/12.3/ISE_DS/ISE/bin/lin64/impact
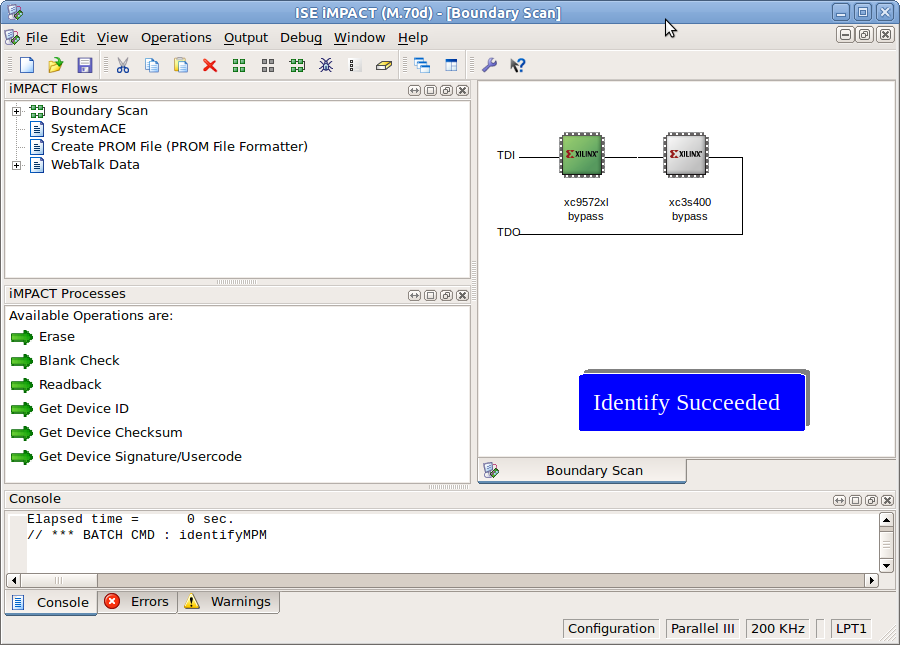
Now in the first box let impact create a project for you. In the second box let impact identify your devices automatically.
In the next box do not yet assign files to the ICs.
If you want to program the CPLD, then look at the files I43CPLD2.JED (200k version) or I43CPLD4.JED (400k version) in the 7i43.zip file on the [Mesa Electronics] web page.
7. Picture
The Mesa Electronics 7i43 FPGA board

A parallel port JTAG cable with an adapter to match the FPGA board's JTAG connector

Choose no here

Select yes here

Select OK here

If you want to program the CPLD or upload a configuration to the FPGA, then select yes here, otherwise no

Choose a file to program the CPLD

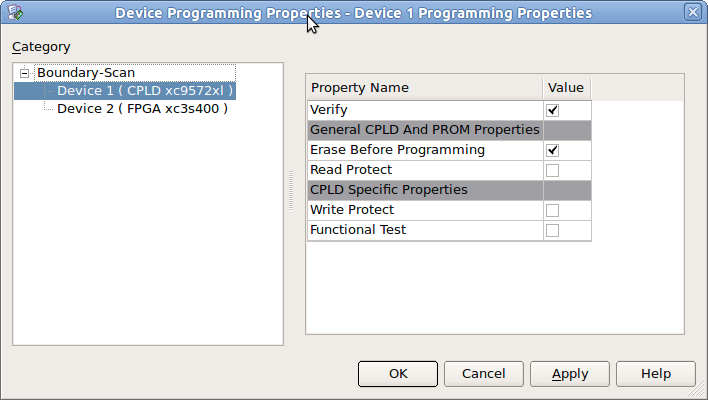
Accept the suggested device programming properties
And then you should be done
Maximilian_H, January 2011
![[Home]](/chips.gif) JTAG Boundary Scan Example For A Mesanet 7i43
JTAG Boundary Scan Example For A Mesanet 7i43